You need to prepare your data for weighted overlay analysis. Weighted overlay services are based on raster layers. This means you may have to convert your existing vector data to raster data. Before converting your data to a raster geoTIFF format, you need to verify each dataset's geometry. You can also project the data to a common coordinate system and clip your datasets to an area of interest. The following tools can be used to prepare your data:
- Run the Check Geometry tool to generate a report of the geometry problems in a feature class.
- Run the Repair Geometry tool to fix problems found by the Check Geometry tool.
- Optionally, run the Project tool to project all of your vector datasets to a common coordinate system.
- Optionally, run the Clip tool to extract features within your area of interest. This reduces the size of your rasters and could expedite configuration and processing times.
- Use one of the tools in the Conversation or the Spatial Analyst toolbox to convert your vector datasets to geoTIFF (.tif). You must use the geoTIFF format.
Note:
The tools that convert vector datasets to raster datasets require a cell size. If you use a common cell size for all rasters, your overlay analysis may be more accurate. You can calculate a cell size based on the extent of one of your datasets.
The following Python code sample calculates a cell size from a feature layer by finding the shortest extent dimension and then dividing it by 250. You can run this from the immediate window in ArcGIS Pro.
ext=arcpy.Describe("your-layer").extent
if ext.width < ext.height:
     cellsize=ext.width/250
else:
     cellsize=ext.height/250
print cellsize
For each geoTIFF file, execute the Build Pyramids and Calculate Statistics tools. This helps improve performance and accuracy of weighted overlay processing.
Handling NoData values
Raster datasets can contain areas with no data. NoData cells can alter overlays by masking out cells beneath them. This has the effect of removing those raster cells from the analysis. You can calculate NoData cell values to another value using the Raster Calculator tool.
Note:
The following workflow is optional. It demonstrates how to use the Raster Calculator tool to calculate NoData values to another value in an input raster dataset.
- Add your raster layer to ArcGIS Pro.
- To visualize NoData cells in your raster dataset, perform the following steps:
- Right-click your raster layer in the Contents pane.
- Click Symbology.
- Click the Mask tab, then click the NoData Color Picker.
- Choose a color from the color picker to visualize NoData cells in your raster layer.
The map display updates to symbolize your NoData cells using the color you chose.
- Open the Raster Calculator tool in the Spatial Analyst toolbox.
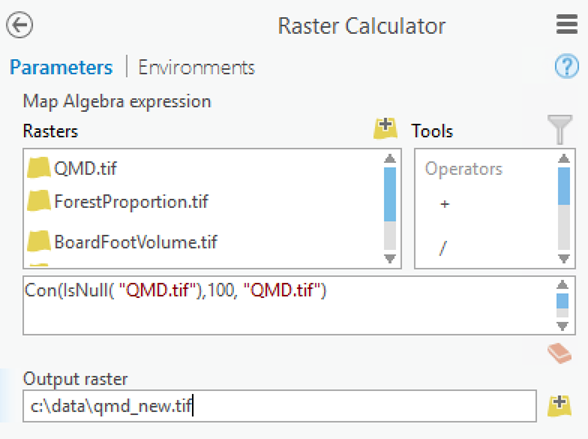
- In the Map Algebra expression text box, type the following expression: Con(IsNull("raster-layer-from-step-1"),no-data-replacement-value,"raster-layer-from-step-1").
- Browse to a location to store your raster for the Output raster parameter.

- Click Run.
The Raster Calculator tool runs and writes a new raster dataset to the location you specified in the Output raster parameter.
In this workflow, you learned how to prepare your data for use in a weighted overlay service.